This installation is for either trial users or customers that have purchased the software.
It is advisable to print this document and follow along with the procedure below!
For installation help or an online demonstration or product questions call us (enable JavaScript for our phone number) or email us (enable JavaScript for our email address)
or schedule a meeting using the following
link:
https://tidycal.com/rl-unisoft/unisoft-software .
Click or cut and paste into your browser the following link: https://unisoft-cim.com/download/requests/cells/cells-mes.zip
After the download is complete unzip the CELLS-MES.ZIP file then double-click on the CELLS-MES.EXE file and follow the instructions on the screen to install the software. Please accept the default path on installation it can be changed later.
After you have installed the software please go to STEP 2 below and follow the "CELLS Workflow MES Product Tracking Quick-Start Manual". This manual contains the CELLS Workflow MES tutorial.
The CELLS tutorial QuickStart manual is below.
If you prefer, there is a Microsoft WORD version of this same tutorial manual below and it is located in the Start/Programs Menu under the "CELLS Workflow MES Product Tracking" folder and there click "CELLS Workflow MES Product Tracking Quick-Start Manual". If you can not find the icon, the actual file for the manual is located at c:\program files\cells\quick-start.doc or c:\program files (x86)\cells\quick-start.doc.
Hello,
Thank you for installing the Unisoft CELLS Workflow MES Product Tracking software (https://www.unisoft-cim.com/cells.php). Below is a tutorial, but first to use the CELLS software we need to connect it to a database so please do that by going to the CONFIGURATION section below. To get started using the CELLS software please skip to the CONFIGURATION section below now.
Note: The CELLS Workflow MES has HELP for most menu items by hovering over the menu item for a second then click any of the videos, manual or website links.
CELLS Workflow MES information:
CELLS Workflow MES overview video
CELLS Workflow MES is a fully integrated Manufacturing Execution System (MES) that provides Process Control and Traceability with product tracking, workflow routing, data collection and document delivery. CELLS Workflow MES is easy to implement, go-live same day.
Below you will find the CELLS Workflow MES tutorial with a sample database provided. The sample database contains 200 serialized units in one work order and 10 subassemblies in another work order and the units are in the process of being assembled. By following the instructions you will get a good idea of how CELLS Workflow MES works by moving product forward in the process routing. You can also create process routings for your own products and track them. The sample database supplied is particular to the Electronics Manufacturing industry and this industry has complex manufacturing processes and demonstrates the depth of the CELLS Workflow MES. CELLS Workflow MES can also track product for any industry such as medical, chemical, aerospace, pharmaceutical, food, textile, etc. If needed contact Unisoft for sample databases that represent other industries.
Below are additional CELLS Workflow MES manuals. Note that these manuals are not needed at this time for running the trial tutorial sample database below.
Additional CELLS Workflow MES manuals for all industries: Manual 4 below is the user manual. Manuals 5 and 6 below are the administrator manuals and detail advanced information on setting up routings, etc. for new product. Icons to these manuals are located in the Start/Programs Menu under the "CELLS Workflow MES Product Tracking" folder and these online versions are translatable into multiple languages. The file name locations are below for the MS Word document versions.
Additional CELLS Workflow MES manuals for electronics manufacturing industry only: For the Electronic Manufacturing Industry via the Unisoft ProntoVIEW-MARKUP software (https://www.unisoft-cim.com/pcbview.php) the CELLS Workflow MES software can display an active PC Board at any step in the process routing. The VIEW-MARKUP manuals below detail some of these features of the CELLS Workflow MES software. Icons to these manuals are located in the Start/Programs Menu under the "CELLS Workflow MES Product Tracking" folder and these online versions are translatable into multiple languages. The file name locations are below for the MS Word document versions.
Sincerely,
Unisoft Customer Support
(enable JavaScript for our email address)
(enable JavaScript for our phone number)
COMPUTER
Any PC running Windows 95 or newer. Approximately 100 megabytes of hard drive space required.
DATABASE
Microsoft Access will serve as our database for this trial demonstration. Any ODBC-compliant database can be used in normal installations. The majority of CELLS Workflow MES installations use Microsoft Access and others use Microsoft SQL Server, Oracle, etc.
SERVER
Any Windows system server. Shared files which are named in the CELLS Workflow MES "DOCUMENTS" table such as CAD files, Word documents, Adobe PDF, annotations, overlays, etc. normally would exist on the server, so a shared directory or directories is required.
WORKSTATION
A CELLS Workflow MES workstation can run on any Windows system. The workstation must have an ODBC client installed which can communicate with the database.
CELLS Workflow MES is connected to its database via the ODBC driver. For this demonstration the sample database we will be using is Microsoft Access. CELLS Workflow MES complies with Microsoft's ODBC database standard and therefore can be used with any ODBC compliant database such as Oracle, Microsoft Access, SQL Server, etc.
To connect the sample database to CELLS Workflow MES via ODBC for this demonstration please do the following:
For Windows 7 or newer users go to step 1 below.
For Pre-Windows 7 users go to step 2 below.
For Window 7 or newer users only: Go to your directory c:\windows\syswow64 and double click the file odbcad32.exe then go to step 5 below.
From WINDOWS click START and CONTROL PANEL.
Click SYSTEM AND SECURITY and select ADMINISTRATIVE TOOLS.
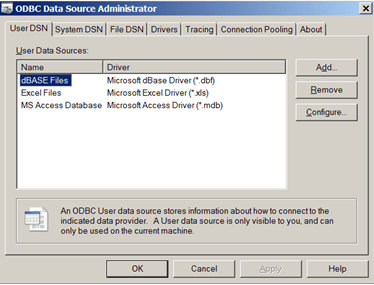
Select DATA SOURCES (ODBC) and the ODBC DATA SOURCE ADMINISTRATOR window is displayed.
Next click the SYSTEM DSN tab, click ADD, then select MICROSOFT ACCESS DRIVER (*.MDB) and click FINISH and a new window will open.
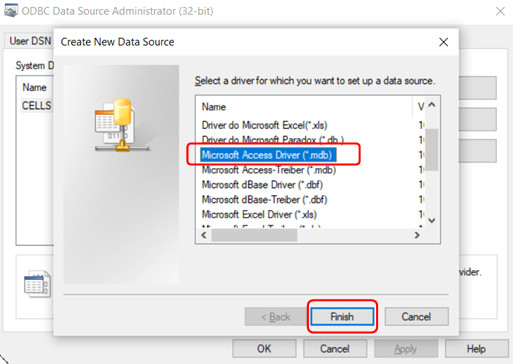
If you do not see the "MICROSOFT ACCESS DRIVER (*.MDB)" then go to either Note1 or Note2 below otherwise go to step 6.
(Note1: If you do not see the "MICROSOFT ACCESS DRIVER (*.MDB)" then you may not have Microsoft Access installed on your PC. Microsoft Access is required for this Unisoft CELLS Workflow MES trial software demonstration. If you do not have Microsoft Access installed on your PC then please download the free trial version of Microsoft Access at the Microsoft websitehttps://www.microsoft.com. After installing Microsoft Access repeat the procedure above starting at step 1. If needed contact Unisoft (enable JavaScript for our phone number) for assistance.)
(Note2: If you do not see the "MICROSOFT ACCESS DRIVER (*.MDB)" and you have Microsoft Access installed on your PC and you are running Windows 7 (64 bit OS) then please close the ODBC window that is open. Next run the file c:\windows\SysWOW64\odbcad32.exe by double clicking it and you should see the ODBC DATA SOURCE ADMINISTRATOR window displayed. Next click ADD in the ODBC DATA SOURCE ADMINISTRATOR window, then select "MICROSOFT ACCESS DRIVER (*.MDB)" and click FINISH and a new window will open. Go to step 6.)
In the DATA SOURCE NAME field in capital letters type the word CELLS. Next in the DESCRIPTION field in capital letters type the word CELLS. Click the SELECT button.
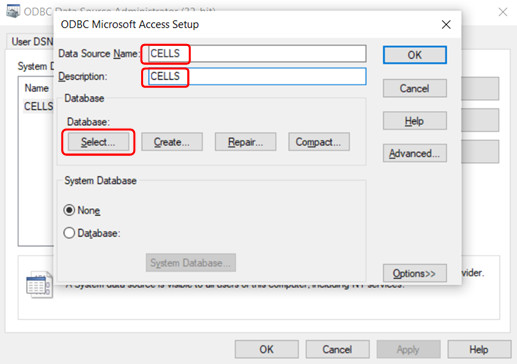
Click the SELECT button and then point and select the directory and file C:\Users\xxx\Documents\unisoft-cells-databases\cells32.mdb where xxx is the Windows user login name when the software was installed. Click OK.
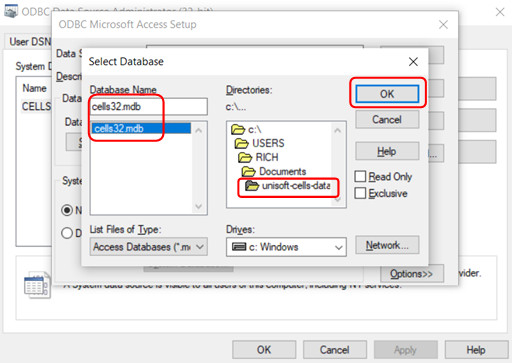
We will use this cells32.mdb database for the tutorial and to aid in creating your first routing.
(Note3: If you don’t see the cells32.mdb database file in this folder,
there may have been a permission issue during installation. You can manually
copy it. A copy of this file should be located in the folder C:\Program Files
(x86)\cells with the filename cells32.mdb. Simply copy that file into the
folder C:\Users\xxx\Documents\unisoft-cells-databases where xxx is the
Windows user login name used during installation. Next, refresh the window by
clicking Documents under Directory in that window, then
click Unisoft-cells-databases again. You should now see the file
cells32.mdb . Select that file and continue to the next step.)
(Note4: If you have created your own database then point to it here. For example: Select the directory and file c:\cells-databases\production-floor.mdb.)
Next click OK twice to close the open Windows.
Connecting the ODBC Driver to the Database is complete. Go to "Creating your own process routings" that follows.
If you were not able to complete the above procedure successfully then please call us at (enable JavaScript for our phone number) for assistance.
If you do not wish to start by creating your own routes for your products then go to "The CELLS Workflow MES Tutorial" section directly below and there it will walk you through the sample database provided that contains 200 serialized units in one work order and 10 subassemblies in another work order & the units are in the process of being assembled. By following the instructions there, you will get a good idea of how CELLS Workflow MES works by moving product forward in that process routing.
If you wish to start creating your own process routings for your own products and track them the best way to do this is by using the CELLS Route Builder.
The CELLS Workflow MES software can track product for any industry. For this tutorial we will be using the Electronic Manufacturing industry with the supplied sample database (cells32.mdb) to simulate product being routed and tracked. The database contains an active work order WO000021 in which there are 200 boards with serial numbers sn000101 through sn000300. These boards are associated with the assembly number ASSY0001 and are being routed according to the process number PROC0001. Subassy WO000023 has a total of 10 subassy sn000401-sn000410 with the assembly number as MOD1. The subassy workorder uses process number PROC0003.
Six of the boards in this sample database are active Work In Process (WIP). By active we mean that they have enter at least the first step of the assembly process PROC0001. The steps below define the sample process PROC0001 from start to finish and where these active units are in the process.
Note: Any of the serial numbers sn000101-sn000300 that are not active can be started by entering its serial number. Below on the right are the Process Routing (Next Step) for PROC0001 in the sample database. The center column indicates the possible outcomes for next step in the routing. The right side column shows where the 6 active serial numbered units are currently in the process.
RMA would be used if the unit was return from customer A or customer B.
Note: The process engineer can design an endless variety of process routings and possible outcomes to suit your manufacturing environment. There are no limits to the steps or outcomes.
The sample database used in this tutorial is outlined in the section above "Overview of the sample database supplied".
In this tutorial that follows we will:
The CELLS Work Order software module can create new workorders and assemblies. The CELLS Work Order software then attaches those workorders and assemblies to process routings to track and build product. To complete the workorder in the CELLS Work Order software the workorder is assigned quantities to be built with or without serial numbers and the process routing to be used on that workorder and which assembly is being built with that workorder.
We will demonstrate how to create a new work order manually.
Note: Many customers inquire about automating the release of Work Orders and
Sales Orders from their ERP, MRP, and PLM systems into CELLS.
There are several ways to achieve this automation and contact Unisoft for
details or go to
https://www.unisoft-cim.com/cells_work-orders-automatic-release.html .
First open the CELLS Work Order Admin software module by double clicking on the "CELLS WORK ORDER ADMIN" icon located in the Start/Programs Menu under the "CELLS Workflow MES Product Tracking" folder.
In the CELLS Work Order Admin software click "FILE" then "OPEN" then "WORKORDER".

Click workorder "WO000021" then click "OK". We'll use WO000021 as our template.

Click on the upper most "NEXT HIGHEST" button which will scan the database for the next unique workorder which is wo000025.
Enter "100" in the Quantity field and then click on the second from the top "NEXT HIGHEST" button located cross from the Starting Serial Number field. The serial number sequence is automatically entered.
On the Assembly ID field select "BROWSE" and you'll see the available assemblies to choose from and for this example select "ASSY0001" and click "OK". The Sales Order ID field is an open text field to associate data such as purchase orders and you can leave this blank.
Select the "BROWSE" button across from the Process ID field and select "PROC0001 COMMERCIAL PRODUCT" and click "OK". The Revision field is also an open text field to identify revision and you can leave this blank.
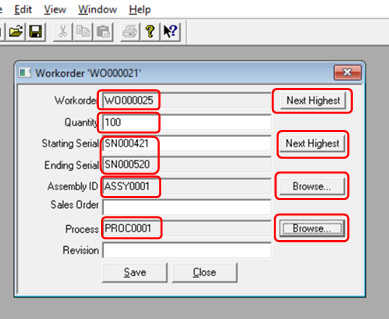
Click "SAVE" and a verification that a new record was added will pop up, click "OK". This signifies that the workorder can now be accessed.
Click "CLOSE" then "FILE" then "EXIT" from the CELL Work Order Admin.
To start the CELLS Workflow MES that the shop floor personnel use, from the Start/Programs menu click the "CELLS Workflow MES Product Tracking" folder then click "CELLS Workflow MES Product TRACKING" and the software starts.
Click "OK" to close the splash page window.
The Please Log In dialog box opens. Note the status in the upper left corner of the software is "Please Log On".
In the Station box, type or select your station. Select "INSPECTION - IN-COMING STATION #1".
In the User ID box, type your ID. Enter "MARY".
In the Password box, type your password. Enter "4117".
Click "OK" to close the window. Note the status in the upper left corner of the software is "User='Mary'. Please open next unit".
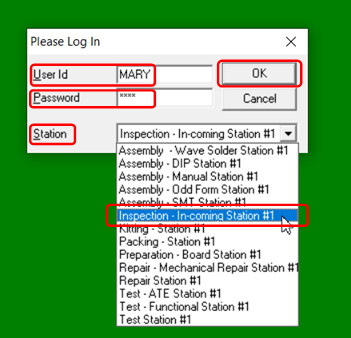
Note: The first time you log on to your station, you will have to enter your station. Going forward you will not have to enter the station unless you share a station.
The default display is set for General Manufacturing.
The General Manufacturing toolbar

For this demo set the display to the Electronics industry. The Electronics industry display allows the user to access features associated with the active PC Board displayed such as find component reference designators, show schematic, find traces, find pins, etc.
Click "VIEW" from the main menu then click "TOOLBARS" then click "ELECTRONICS MANUFACTURING". The CELLS Workflow MES display is now set for Electronics Manufacturing.
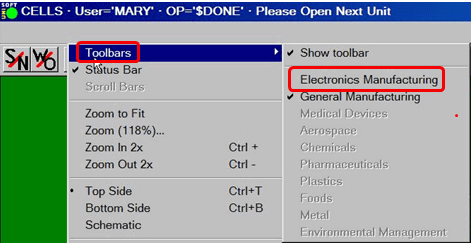
The Electronics Manufacturing toolbar

CELLS Workflow MES offers several flexible ways to open units and find available work. You can open units by one of the following methods:
This method of locating an assembly from a particular operation helps to expose the inventory available.
On the "FILE" menu, click "SELECT OPERATION". The Select An Operation dialog box opens.
(Note: In some areas of the shop floor you may wish to limit or simplify the actions of the user. For example remove the keyboard and mouse and the user scans in actions from barcodes on paper or scan the actions directly from the screen display, etc.)
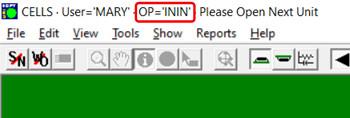
Select "PROC0001 ININ INCOMING INSPECTION", click "OK".
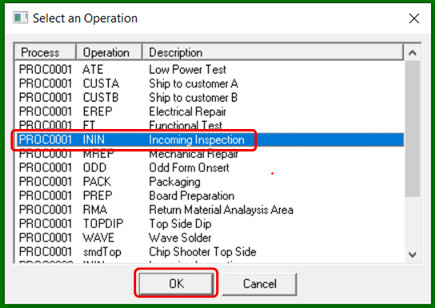
It might seem that nothing has happened but by looking at the top left on the blue bar of the CELLS Workflow MES window you'll notice that OP=ININ has appeared. This flags the CELLS Workflow MES software to look at all the current Work In Process (WIP) on the production floor and pull all available workorders for this operation for the products that are in the process of being built.
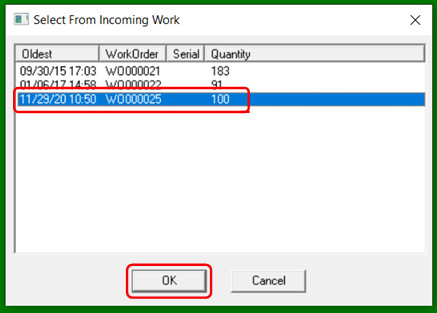
Reopen the "FILE" menu and select "OPEN FROM LIST". A window opens telling you the current work order/Units at this particular operation (In this example Incoming Inspection). Select Workorder "WO000025" and click OK to activate your selection.
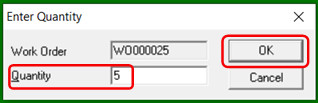
In the Quantity window type "5" units, click "OK". This is the Workorder that was just created.
A Task List box opens and the assembly will appear in the background. Note that CELLS Workflow MES has opened the PC board as the relevant main document on the display for this operation however virtually any type of document can be displayed such as Adobe PDF, MS Word, AutoCAD DXF, etc. Also, inspection overlays have been added to the display for this step. Further for this operation the task of data collection has been invoked and date code & part lot code data will be collected.
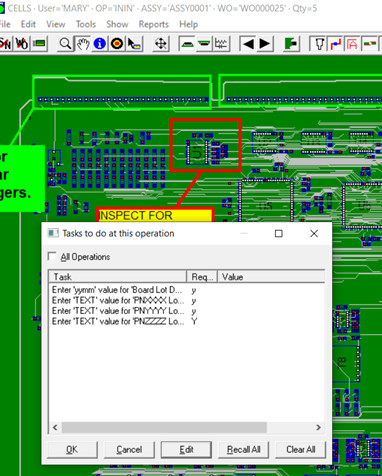
The "Tasks to do at this operation" box is displayed. CELLS Workflow MES has been told to collect lot and part number date codes at this operation.
Click to select the first item in the list then click "EDIT" and type "0112" for a date then click "OK" and repeat this for the other remaining 3 task items in the box.
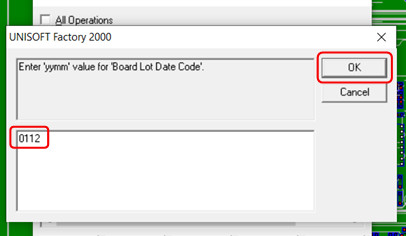
When all 4 task items are filled in, click "OK". The data collected is now stored in the history table. Note the status indicator in the upper left of the display is "WO='WO000025' Qty=5".
Note: Once your work-in-progress, failure/quality or other data is in the CELLS Workflow MES database, you can use CELLS Workflow MES to create reports or use any report writer or analysis tool that supports ODBC (Crystal Reports, Access, SAS, Excel, etc.). You can even publish the reports to your CELLS Workflow MES intranet or provide dynamic report generation through CELLS Workflow MES or any web browser. Standard reports are available from the main menu by clicking REPORTS.
We will now move the unit forward to the next operation.
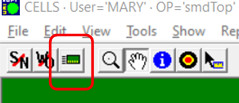
Click "FILE" from the main menu then click "NEXT STEP" (you can also click the third icon from the left on the main menu).
We will choose the default of PASS which will move the units to "GOTO Board Preparation", click "OK".
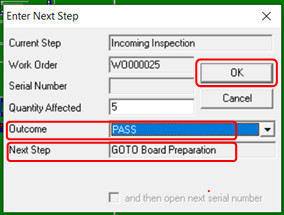
These 5 units have now been passed forward and the status in the upper left for Mary is "Please open next unit". Note that other outcome options are ELECTRICAL FAILURE, MECHANICAL FAILURE or you can create any other outcome you wish. When creating a new routing in CELLS Workflow MES the steps and outcome options are unlimited.
After the serial number is entered, the system then goes through a series of checks.
Note: Towards the top of this document the section titled "Overview of the sample database supplied" displays the step in the routing for the active serial numbers in this work order.
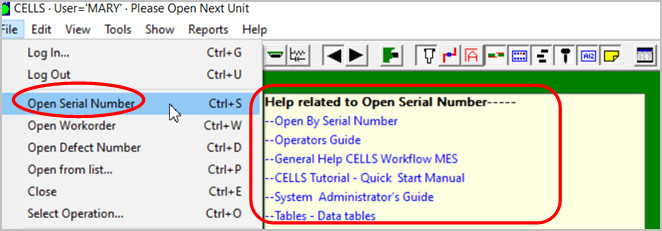
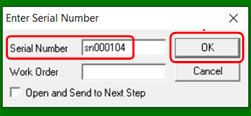
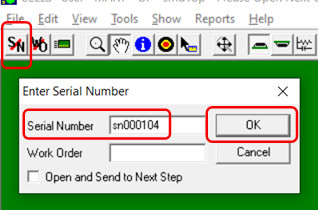
On the "FILE" menu, click "OPEN SERIAL NUMBER". The Enter Serial Number dialog box opens. Note the first icon "S/N" on the left of the top main menu is another way to enter a serial number.
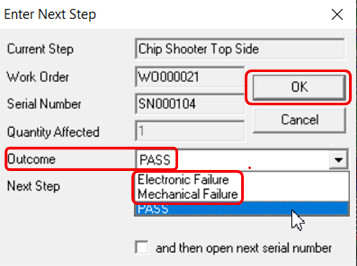
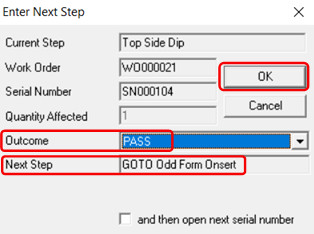
In the Serial Number field, type the serial number "SN000104" (normally a barcode scanner would enter the serial number). Click "OK".
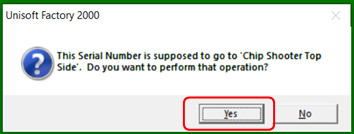
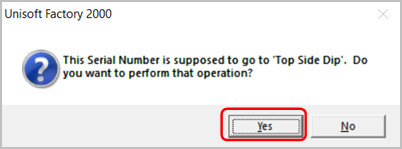
A window opens telling you the current operation and asking you if you want to perform that operation. The current operation is "This Serial Number is supposed to go to Chip Shooter Topside". Click "YES".
Click "VIEW" from the top menu and click "ZOOM TO FIT".
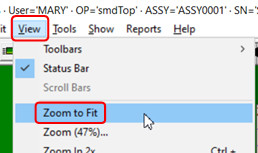
Note that CELLS Workflow MES has opened the relevant main document on the display for this operation. Also if you click "VIEW" from the main menu you will see available views and documents allowed at this operation that the operator has access to. The programmed views and documents are numbered 1 through 10 at the bottom. Feel free to explore them. Any view, document, movie, etc. can be display in CELLS Workflow MES (HTML, PDF, WORD, WMV, etc). Use existing intranet documents or add any internet plug-in without limit and display them all. If you do explore the VIEW menu then please make sure to set the View to #2 "2. Electrical View" before proceeding to the next step.
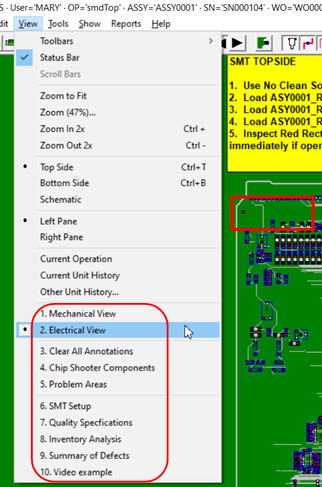
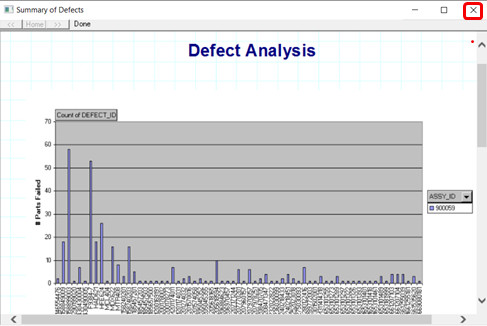
Let's view the Defect reports under the view menu item #9.
Click "VIEW" and select "9. Summary of Defects".
These graphs represent failure defects. (Note: Through the use of custom developed queries graphical representations of any type can be created from any of the tables within the CELLS Workflow MES database.)
Click the "X" in the upper right of the box to close this screen.
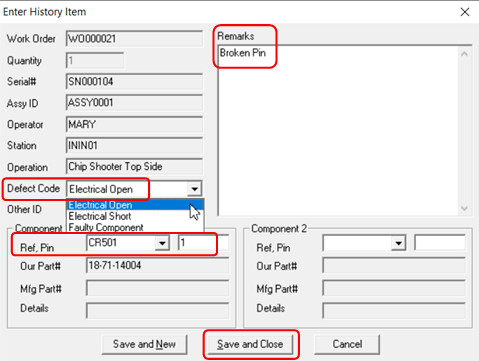
Let's assume Mary found a defect of a broken component pin on CR501 pin 1 and she wants to log it.
Click "FILE" and click "LOG A DEFECT" and the Enter History Item box appears.
Click the drop down selection next to Defect Code and select "ELECTRICAL OPEN" and then next to the field "Component 1" choose "CR501" from the drop down menu and type in "1" in the pin# text box then in the remark box type "Broken Pin".
Click "SAVE and CLOSE". The defect is now logged.
We will now move the unit forward to the next operation.
Click "FILE" from the main menu then click "NEXT STEP" (you can also click the third icon from the left on the main menu).
We will choose the default PASS which moves the unit to "GOTO Top side dip" (Note that other outcome options are ELECTRICAL FAILURE and MECHANICAL FAILURE).
Click "OK".
The unit has been passed forward and the status in the upper left for Mary is "Please open next unit".
Let's have Mary open the same unit serial #sn000104 again and perform the next operation required.
Click the "S/N" icon, it is the first icon on the left of the main menu. Type "SN000104" in the Serial Number field (normally a barcode scanner would enter the serial number). Click "OK".
A window opens telling you the current operation and asking you if you want to perform that operation. The current operation is "This Serial Number is supposed to go to Top side dip". Click "YES" to perform that operation.
Note that CELLS Workflow MES has opened the relevant main document on the display for this operation. This "Top side dip" operation also has additional setup documents for the operator and to see them click "VIEW" and select "5. DIP SETUP PROCEDURE".
Click the "X" in the upper right of the box to close the window.
Let's assume the operation has been performed and click the "NEXT STEP" icon, it is the third from the left on the main menu.
Click "OK" to use the default PASS to move the unit to the next operation "Odd Form Insert".
In the steps above we have basically shown how a unit is routed in CELLS Workflow MES.
CELLS Workflow MES collects all relevant data such as date and time stamps, serial numbers, work order and lot numbers, operator ID of the person performing the operation, operation and tasks perform, defect codes, etc., all stored in the history database table.
For this example a sub-assembly previously installed will first be removed and a new one added:
Click the "S/N" icon, it is the first icon on the left of the main menu. Type "SN000106" in the Serial Number field then click "OK". Displayed on the screen will be "This serial number is supposed to go to Low Power Test", Click "YES".
The popup window "Task to do at this operation" appears.

It shows that a subassy sn000401 is already installed in location J1 . Normally a subassy would not be installed but we have previously installed this subassy to demonstrate the Remove Subassembly feature. Under Value in the popup window it says MOD1/WO000023/SN000401 which means that this sub-assembly is assembly MOD1 and is part of WO000023 and therefore built according to the process outlined for that Workorder and its individual serial number is SN000401. Click "OK" to close this popup.
Click "FILE" from the main menu then click "Add/Remove Subassembly".

In the "Add/Remove Subassembly" popup window click the top listing to select it and then click on the "REMOVE" button. We have removed the subassy installed at location J1 and this location will now be free to install a new subassy.
Note: The sub-assembly to pick from for installation are available for installation after they have completed their process routing first within CELLS Workflow MES (i.e., in the $DONE Operation).
Click on the "ADD" button. A prompt will ask for a "Subassembly to Install". In this example serial numbers sn000401 to sn000410 have been generated as a valid subassy pool to pick from.
In the Serial Number field type "SN000402" and click "OK".
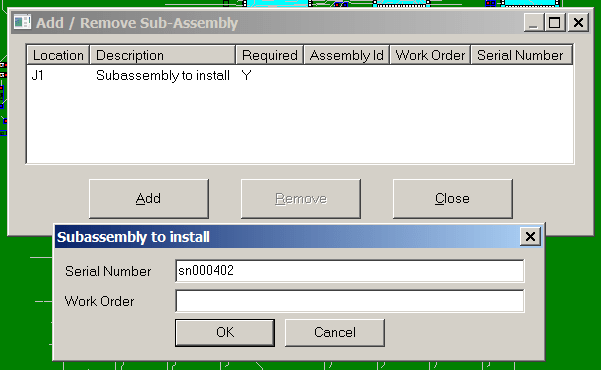
A pop up box will ask if it's ok to serialize this unit, select "YES". The pop up now indicates that location J1 has subassy sn000402 installed.

Click "CLOSE" to close the popup.
In summary, the subassy feature will track units based on a parent child relationship. The history can also be viewed by double clicking the event under the view history option. For example, from the Main menu click "VIEW" then select "CURRENT UNIT HISTORY".
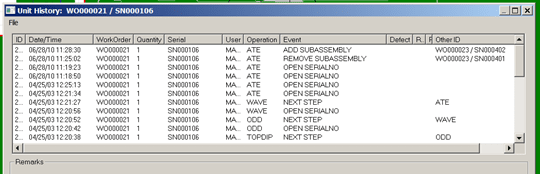
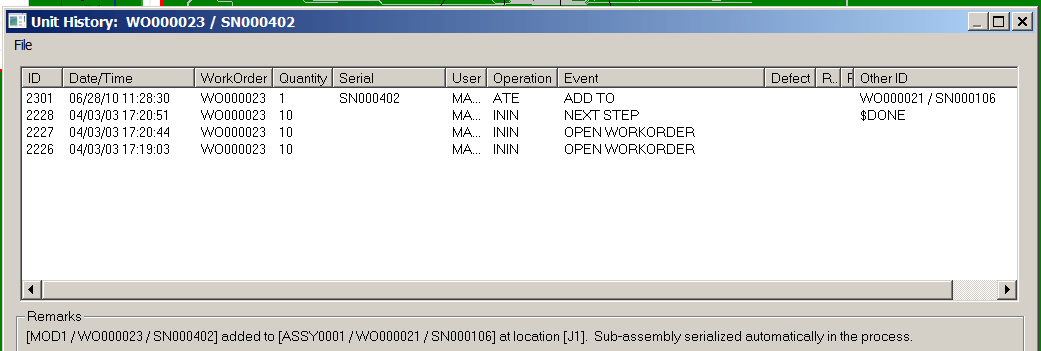
You'll see in the Event column Add Subassembly and double-click this line item and the history of the sub assembly will be brought up.
You can drill down into this parent child relationship as deeply as needed to find the unit build history information you need on the assembly process. To close the box click the "X" in the upper right of the box. Let's assume the operation as been performed and click the "NEXT STEP" icon, it is the third from the left on the main menu. Click "OK" to use the default PASS to move the unit to the next step.
You may wish to view the history of any unit to see where it's been, what's been done to it, or the defects that have occurred. CELLS Workflow MES provides you an easy way to find that information.
Click "VIEW" from the main menu and select "OTHER UNIT HISTORY".
In the serial number field type "SN000103" and click "OK" (do not enter any workorder data).
A history screen will appear for the module. Double click on any item to view details. Once you're done, click on the "CLOSE" button in the upper right hand corner.

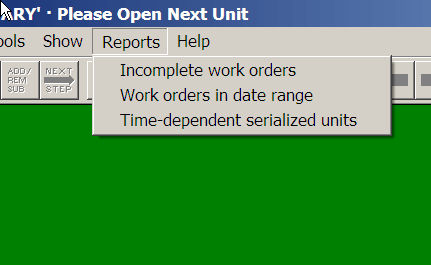
CELLS Workflow MES provides many reports. For example the simple quick report below is available from the Report menu and displays a Work Order Summary with one line per work order. It is viewable by current unfinished WIP, date range, etc.
Click "REPORTS" from the main menu then select "INCOMPLETE WORK ORDERS" and click "OK". Displays similar to the ones below are shown.
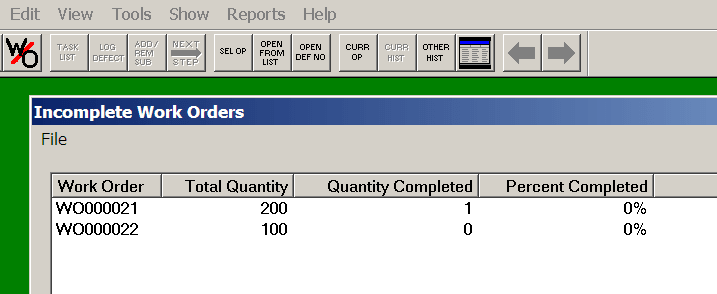
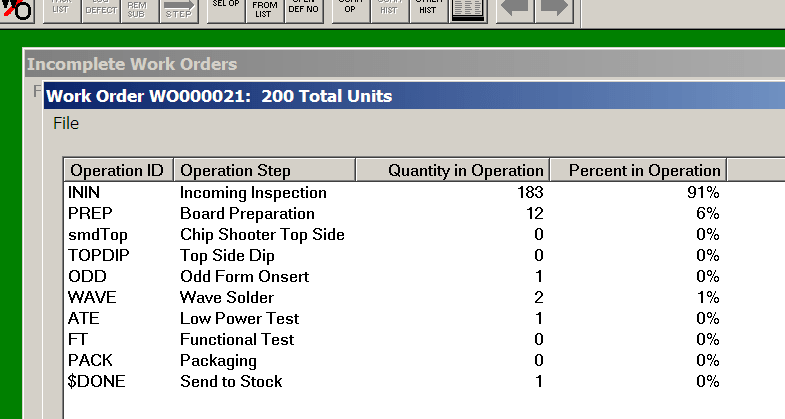
Double click "WO000021" on the work order line and a second drill-down report is displayed showing detailed status for each operation step in the work order. For example the drill-down report for work order WO000021 in the figure below is reporting 183 units of the 200 total are at Incoming Inspection.
The CELLS Workflow MES tutorial is complete.
The CELLS Workflow MES tutorial is complete. If you wish to reset to the original sample database to restart the demonstration do the following:
Copy the file \program files\CELLS\images\cells32.mdb or \program files(x86)\CELLS\images\cells32.mdb to \program files\CELLS\ or \program files(x86)\CELLS\ and replace the file already there.
There are several options for creating your own routings in CELLS Workflow MES and we will address two of them below.
Easily create your production routings that specify the steps that are used to manufacture your product in minutes.
The CELLS Route Builder provides a natural recommended way to populate the PROCESS, NEXT_STEP, OPERATIONS and CONDITIONS tables that are located in the database by using an Excel spreadsheet. You can enter data according to the flow of the process being described rather than entering data directly into the tables in the database in a fragmented, out-of-order manner.
This straight forward Excel based route builder creates new production process routings in minutes. Create new process routing from scratch or import an existing process routing then modify and export out as your new process routing.
To use the "CELLS Route Builder" go to:
A variety of languages for the manual can be selected here.
Although not the recommended method this option 2 method is to enter and edit your routings directly in the database that is attached to the CELLS Workflow MES.
Some customers use a combination of the CELLS Route Builder in Option 1 above and then manually editing the database as outline here in option 2.
Example of option 2 follows: Included in the installation is Starter.MDB, a basic set of tables for someone beginning in CELLS Workflow MES Product Tracking. If you wish to we will use this starter database to input one of your processes for one of your products. You tell CELLS Workflow what to do via the tables in the .MDB. Normally one .MDB will contain all your processes for many products however you could have multiple MDB's with one process in each. A .MDB file is a Microsoft Access database so you will need a copy of Microsoft Access installed on your PC to modify the tables. Some of the tables in the Starter.MDB have simple samples of what is normally in the table. We will simply overwrite the contents of these tables with your process data. The Starter.MDB file is located in the directory c:\program files (x86)\cells if you took the default on installation.
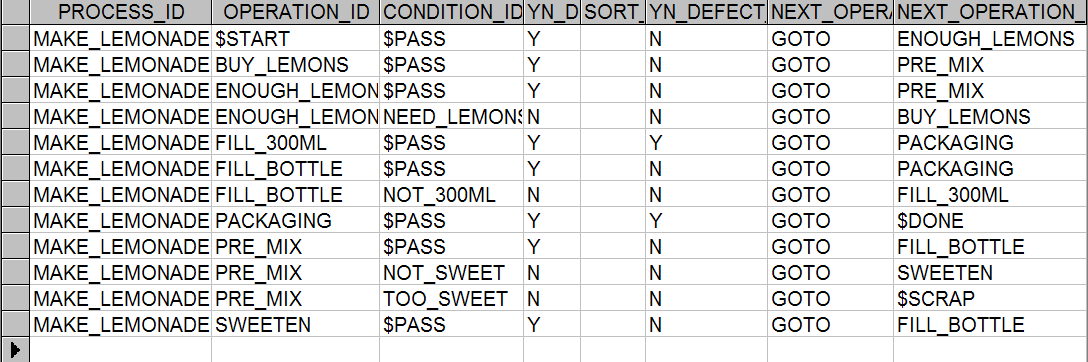
Possibly the most important table in CELLS WORKFLOW is the NEXT_STEP table. The job of the NEXT_STEP table is to make sure your product is built exactly the way you tell it to. The NEXT_STEP table contains the complete routing process that a particular product will travel through to be built. The NEXT_STEP table can contain any number of Processes. A simple sample in the NEXT_STEP table is below. In the NEXT_STEP table below the name of the process is MAKE_PIECE which is identified under the column PROCESS_ID. The first operation step is $START under the OPERATON_ID column. The OPERATION_ID lists all the major steps in the process. The first operation step $START only has one option to go to and that is to $PASS under the CONDITION_ID field. The CONDITION_ID column lists all the possible places that the unit can go to from that step. So operation $START can only go to $PASS which then sends the unit to INSP listed under the NEXT_OPERATION column. Now the unit is at the second step INSP (OPERATION_ID) and there are two options the unit can move to the first is $PASS (CONDITION_ID) which passes it to $DONE (NEXT_OPERATION) and the other option is TEST_FAIL which passes it forward to $SCRAP. Both $DONE and $SCRAP indicate the process MAKE_PIECE has finished.

The user may create as many Operations and Conditions with any label names desired. The exception is Conditions and Operations names preceded by $. These maybe inserted in the tables by the user but are reserved and have special meaning to the CELLS Workflow MES. For example the operation $DONE when used in the NEXT_STEP table tells CELLS WORKFLOW the process has finished.
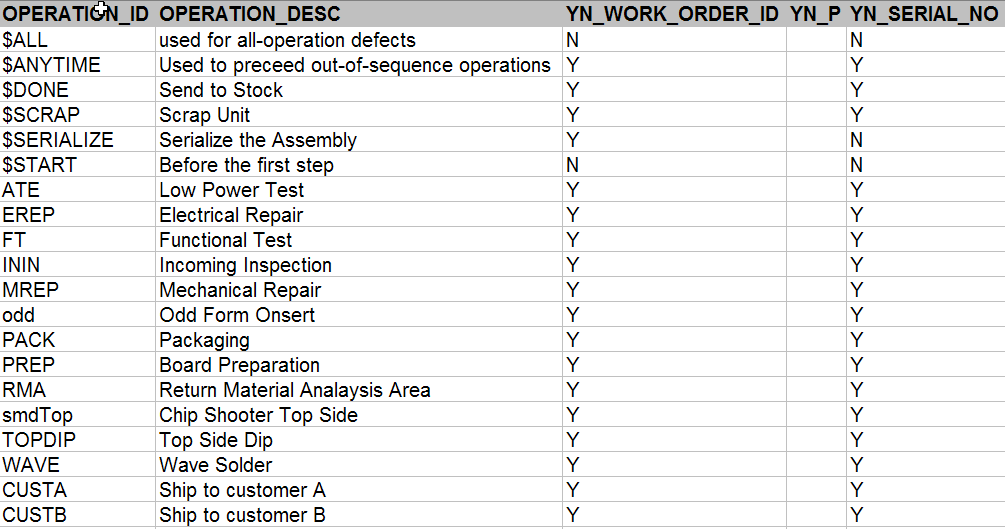
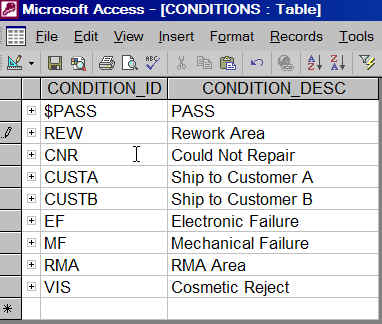
Unisoft will help you create your first routing however before we can create your first process routing in the NEXT_STEP table we need your help filling out a few of the other tables. The "names" you use in your processes is what we need. You can use this STARTER.MDB to edit these tables with the names used in your process then we can do the rest of the setup. Please edit the OPERATION and CONDITIONS tables, below are examples of Operation and Conditions tables for your reference. When the tables are ready please contact Unisoft.
Flow Chart: Also we will need some type of flow chart with the steps for the process you wish to create in CELLS WORKFLOW. It is best to choose a shorter process for the first one. We will use this flow chart to create the NEXT_STEP table.
For details on CELLS WORKFLOW you may refer to the manuals System Administrator Guide and the Appendix. These are the systems administrator manuals and detail advanced information on setting up routings, etc. for new product. The icon to each manual is located in the Start/Programs Menu under the "CELLS Workflow MES Product Tracking" folder, see icons "manual-CELLS WORKFLOW System Administrator" and "manual-CELLS WORKFLOW Appendix1".
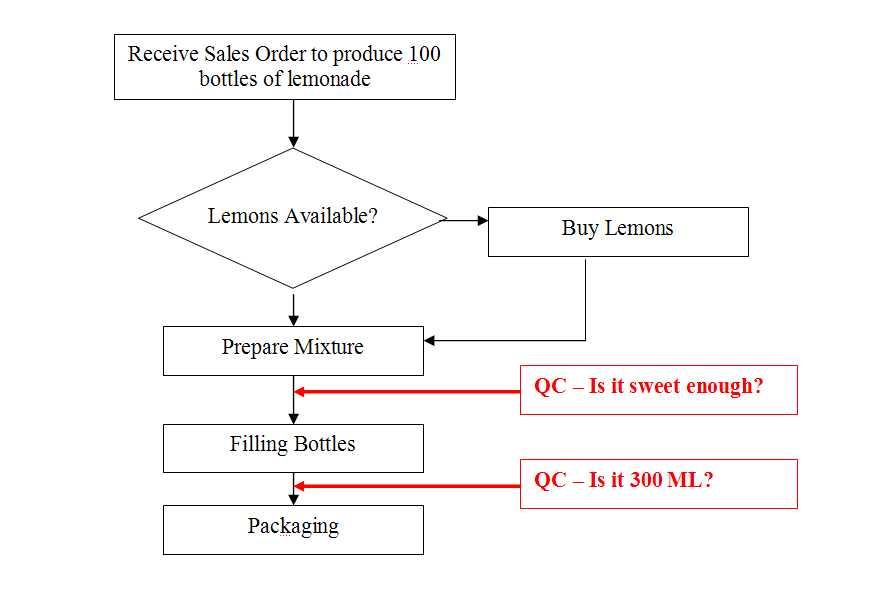
Another short sample .MDB database that can be reviewed is called LEMONADE.MDB. It is located in the directory c:\program files\cells or c:\program files(x86)\cells. There is also a flow chart document for LEMONADE on the same directory called LEMONADE_FLOW-CHART.DOC. The NEXT_STEP table and flow chart for Lemonade are also shown at the end of this document.
CELLS Workflow MES is a fully integrated Manufacturing Execution System (MES) that provides Process Control and Traceability with Tracking (product, inventory, and quality), Workflow/Routing, Data Collection, and Document Delivery.
CELLS Workflow MES can be configured in an endless variety of ways to suit your manufacturing environment from Electronics to Medical Devices, Semiconductors, Aerospace, Chemicals, Pharmaceuticals, Foods, and General Manufacturing applications.
It is our pleasure to assist you and make sure the software, workflow/routings, and tracking is up and running quickly. Please feel free to contact us anytime.
CELLS Workflow MES information:
Note: Manuals 5 and 6 listed below are the systems administrator manuals and detail advanced information on setting up routings, etc. for new product. The file name locations are below and icons to each manual are located in the Start/Programs Menu under the "CELLS Workflow MES Product Tracking" folder.
For assistance call us (enable JavaScript for our phone number) or email us (enable JavaScript for our email address).
CELLS WORKFLOW MES MANUALS FOR ALL INDUSTRIES — Manual 4 listed below is the USER manual. Manuals 5 and 6 are the System Administrator manuals. Manual 1 is a basic Windows operation manual for personnel on the production floor that might be unfamiliar with basic Windows functions. Icons to each manual are located in the Start/Programs Menu under the "CELLS Workflow MES Product Tracking" folder and these online versions are translatable into multiple languages. The file name locations are below for the MS Word document versions.
CELLS WORKFLOW MANUALS FOR ELECTRONICS MANUFACTURING INDUSTRY ONLY — For the Electronic Manufacturing Industry via the Unisoft ProntoVIEW-MARKUP software (https://www.unisoft-cim.com/pcbview.htm ) the CELLS Workflow MES software can display an active PC Board at any step in the process routing. The VIEW-MARKUP manuals below detail some of these features of the CELLS Workflow MES software. The file name locations are below. Contact Unisoft for help in importing your PCB assembly ( PCBA ) design for active display in CELLS Workflow MES.