The process outlined below with the Cells Route Builder and the Cells Work Order
Admin software will step you through creating your own process routings for use in the
CELLS Workflow MES software.
The CELLS Workflow MES is designed to be used in any industry to track
product. In addition Unisoft has
a specialty in providing automation software for the
electronic manufacturing industry.
If you have not installed the
CELLS Workflow MES software click here.
For
help contact Unisoft and we can go online with you.
Important:
If you do not wish to create your own route for your product
as outlined in the procedure below at
this time then please go to the following link
CELLS Tutorial manual by clicking here. There you
will get a detailed understanding of the CELLS software
and you will be
walked through a sample database provided that contains 200 serialized units in
one work order and 10 subassemblies in another work order & the units are in the
process of being assembled. By following the instructions there you will get a
good idea of how CELLS Workflow MES works by moving product forward in that
supplied sample process routing.
About
the Cells Route Builder:
To create your own process routing for your products the CELLS Route
Builder, that will be outlined below, provides a quick natural
way to populate the
PROCESS, NEXT_STEP, OPERATIONS and
CONDITIONS tables by using an Excel spreadsheet.
These tables direct the CELLS Workflow MES software on how to route your
products. With
CELLS Route Builder you can enter data according to the flow
of the process being described rather than entering data directly into these
tables in the database in a fragmented, out-of-order manner.
The CELLS Route Builder uses a
simple Excel spreadsheet interface and creates new
production process
routings
in
minutes. You can create new process
routings from
scratch or
import an existing
process
routing from CELLS Workflow then
modify it and export it out as your new
process routing.
The CELLS Route Builder is a
Microsoft Excel
file
“CELLS-Route-Builder.xlsm”.
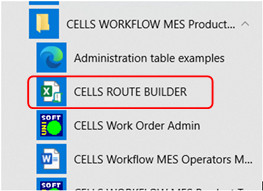
The CELLS Route Builder can be started in any of the following ways:
- A CELLS Route Builder icon is
located on the desktop.
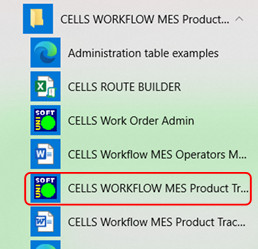
- In the Start/Programs Menu in the
"CELLS WORKFLOW MES Product Tracking" folder click CELLS ROUTE BUILDER.
- File location by default c:\program
files(x86)\cells\CELLS-Route-Builder.xlsm
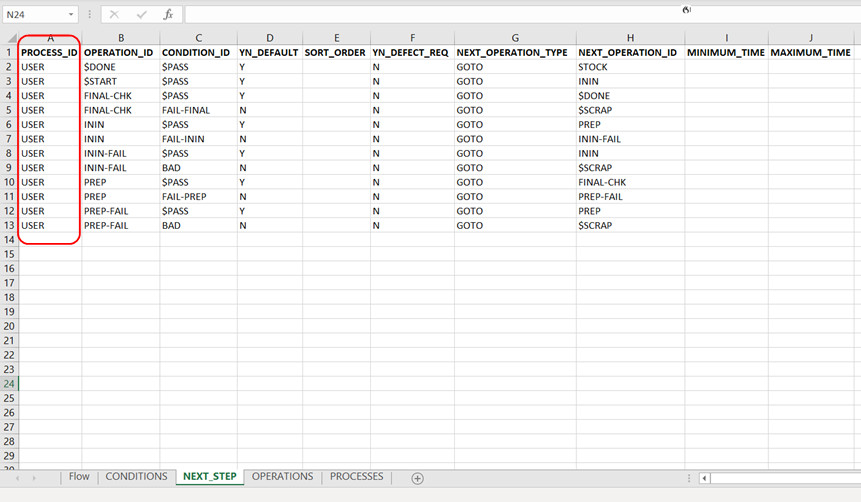
CELLS Route Builder Tables:
To use the CELLS Route Builder, you first must have some understanding of four tables in the CELLS database:
In the CELLS Route Builder these four tables are locate in the tabs at the
bottom. There is also a fifth table, the FLOW table, and it is where the user
brings the other
tables together in a simplified organized manner to create a process flow to build their product
routing.

General information about entering and editing data in the CELLS Route Builder:
1. For the most part, you can treat the spreadsheet in the CELLS Route Builder as you would any spreadsheet. Specifically, you can repeatedly do the following:
a. Change an operation or a condition in a cell. There are three ways:
i. Click the cell, click the dropdown arrow for the cell, and select an operation/condition.
ii. Double-click the cell and type an existing operation/condition.
iii.Double-click the cell and type a new operation/condition. The CELLS Route Builder will prompt you for information that describes the new operation/condition.
b. Delete operations or conditions in one or more cells by selecting a range of cells and clicking the delete key.
c. Delete one or more entire rows.
d. Insert rows.
e. Cut and paste ranges and rows.
2. You have the option of changing data in the other sheets in the workbook, namely CONDITIONS, NEXT_STEP, OPERATIONS, and PROCESSES. Any changes you make to these sheets will be reflected in the FLOW sheet.
3. When you are satisfied with the state of the description of the steps in the process, click the WRITE TO DATABASE button to save the data. Changes to data in any of the sheets will be written to the database.
About the Cells Work Order Admin:
After the CELLS Route Builder creates the route then the Cells Work Order Admin
adds the Assemblies as needed and creates the Workorder that the process route is
associated with.
Optional method:
The
Cells Route Builder and the Cells Work Order Admin automate the process of
populating the CELLS Workflow MES software database tables.
It is
recommended to use the Cells Route Builder and the Cells Work Order Admin. However
if desired these database tables can also be populated manually
directly in the database. Some individuals prefer the manual method or a
combination on some projects. If you wish to manually enter data into the
tables here are examples of how they look and these two manuals are
helpful System
Administrator Guide
and
Database tables Guide.
Note:
Usually it is good practice to backup any CELLS database before it is used
with
the CELLS Route Builder. The sample
database that comes with the software is CELL32.MDB and the file is
located at
C:\Users\xxx\Documents\unisoft-cells-databases\cells32.mdb where
xxx is
the Windows user login name when the software was installed. You can have your
own databases located anywhere you wish.
GETTING STARTED:
Note:
Before the CELLS Route Builder can be used the CELLS software needs to be
connect it to a database so if you have not already done this please do so now
by going to the
CONFIGURATION section
https://www.unisoft-cim.com/cells_download.htm#config . After you have
completed the configuration please return here and continue below.
There are four steps below:
1) Creating your own process routings using CELLS Route Builder.
2) The process routing created is assigned a new Assembly and Work Order using the CELLS Work Order Admin.
3) Test
the new process by running the route through the CELLS Workflow MES software.
4) Database Tables that are edited directly.
Note:
Throughout the procedures outlined below
you can substitute in your own data for a
product you are building.
1) Creating your own
process routings using CELLS Route Builder:
What follows is the short version for this step "1) Creating your own process routings using CELLS Route Builder:" and below this short version is the detailed version with a step-by-step breakout and graphics of what is happening.
Short version:
First start the CELLS Route Builder.
Click READ FROM DATABASE.
Click USER from the pulldown list and click READ FROM
DATABASE.
Creating a new Operation:
Below the Operation PREP insert a row as you would normally
in Excel.
Select the cell A14 and type at the top or directly in the
cell FINAL-CHK<enter>
Next click YES.
Type FINAL CHECK and click ok.
Click OK. Click OK.
Click cell C14 then from the pulldown list click Condition
$PASS.
Click cell D14 then from the pulldown list click Operation
$DONE.
Click cell D13 then from the pulldown list click Operation
FINAL-CHK.
Creating a new Condition:
Select the cell F14 and type at the top or directly in the
cell FAIL-FINAL<enter>
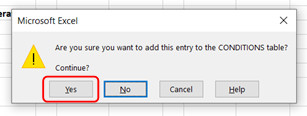
Next click YES.
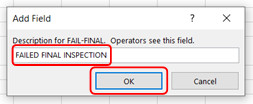
Type FAILED FINAL INSPECTION and click OK.
Click cell G14 then from the pulldown list click Operation
$SCRAP .
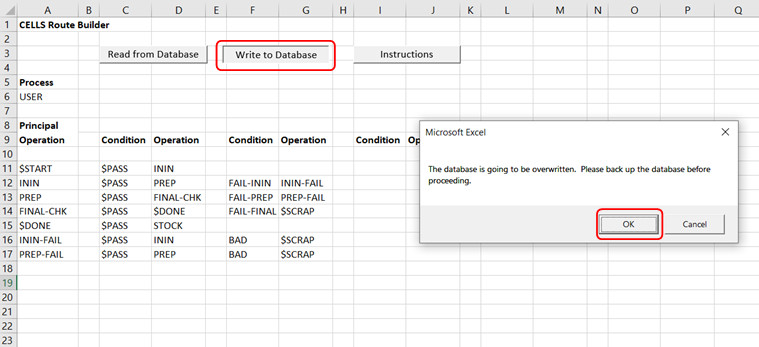
To save the process:
Click WRITE TO DATABASE and click OK.
-------------
Detailed version:
First start the
CELLS Route Builder.
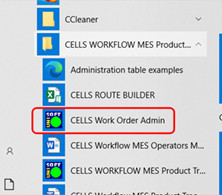
In the Start/Programs Menu in the "CELLS WORKFLOW MES Product Tracking" folder
click CELLS ROUTE BUILDER.
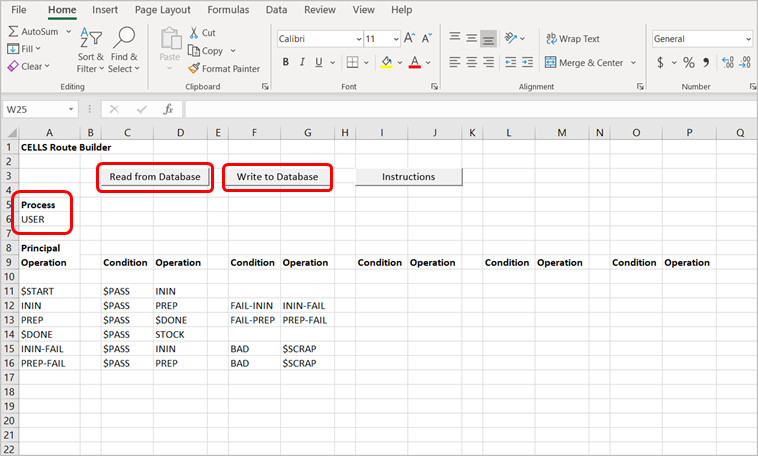
By default you will be on the FLOW tab of the CELLS Route Builder. Click READ FROM
DATABASE.
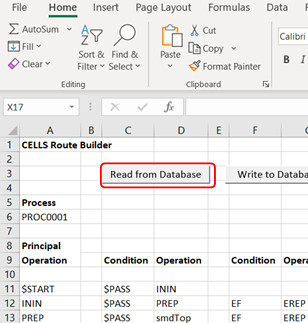
Click the Process USER from the pulldown list and click READ FROM DATABASE.
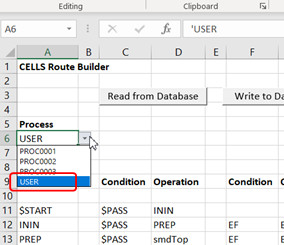
The Process USER was previously created but is not complete and we will complete
that route in the procedure below. You can see that process and others
by clicking the PROCESSES tab in the CELLS Route Builder.
For your product
routings you can call the Process whatever name you desire for any industry you
are in. For example: PCB-321-ASSY, PCB-TEST, SERIALIZE-BOARD, ASSEMBLY/TEST,
BLADE-ASSY-INSTALL, CERAMIC, COMMERCIAL-PRODUCTS, ENGINE-MAINTENANCE,
FDA-MEDICAL-DEVICES, GENERAL-MAINTENANCE, OVERHAUL, PASTRY-FROSTING, PATH-1,
SUBASSEMBLY, VALVE-REPAIR, VEHICLE-1, XYZ-SERIES-BENDING, etc.
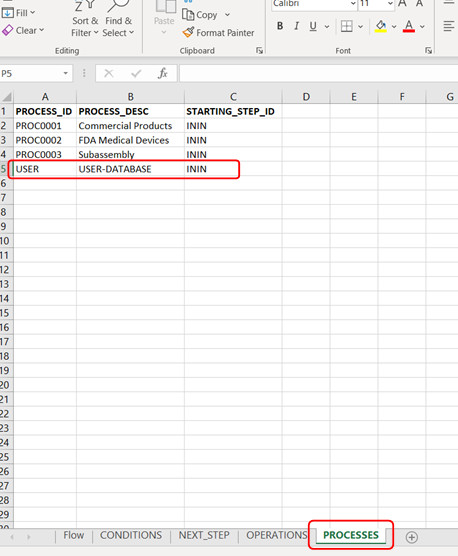
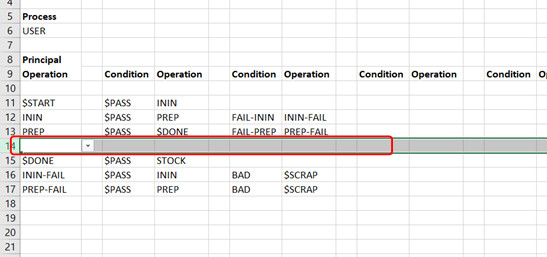
The result is in the figure below.
Our Process we are calling USER and we have a few Operation steps already in
this process to get us a head start.
Note for your product routings you can
call the Processes and Operations whatever names you desire and you can also
start with zero Operation steps to start with
if you wish.
To save time most customers when creating a new Process will READ FROM DATABASE
a Process that they have already created. Next they simply edit that Process
accordingly for the new process and then they WRITE TO DATABASE and that
new Process is now part of the
database.
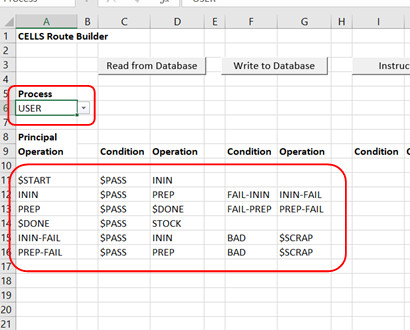
Creating a new Operation:
Next we will insert a row and create an new Operation.
Below the Operation PREP insert a row as you would normally in Excel.
Select the cell A14 and type at the top or directly in the cell FINAL-CHK<enter> for the new Operation and this is the short mnemonic
for the Operation name.
For your product
routings you can call the Operation whatever name you desire for any industry
you are in. For example: SMD-TOP, ATE, PCB-INSPEC, BARCODE, BOTTLE-FILL/LABEL,
COATING, DIE-CUT, FIBERGLASS, GLUE, KITTING, MILLING, PACK, PICK-PARTS, PREP,
PRESS, SEWING, SHIP, X-RAY, etc.
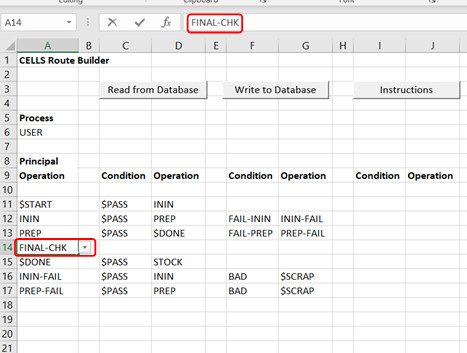
Next click YES.
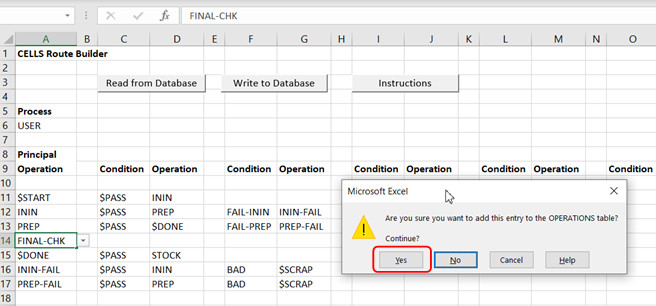
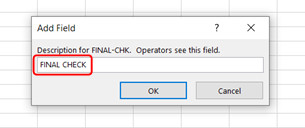
This window is the long name for the Operation. Type FINAL CHECK and click OK. Note for your product you can use whatever name you desire.
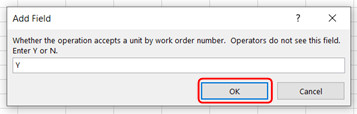
This window asks whether the Operation will accept the unit by work order and the default is Y. Click OK.
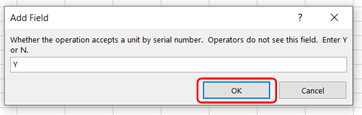
This window asks whether the Operation will accept the unit by serial number and the default is Y. Click OK.
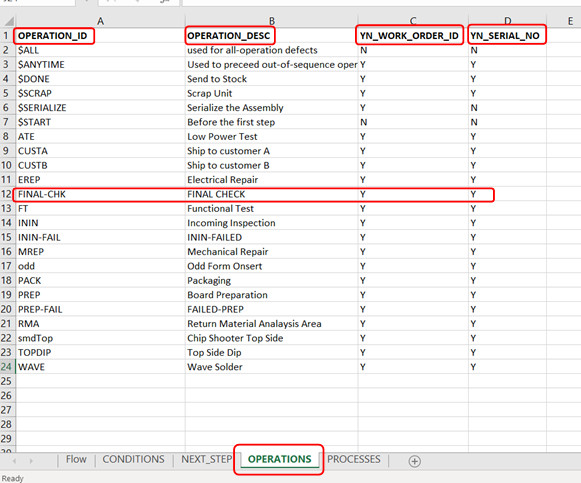
The result is this new Operation FINAL-CHK is created and you can
see that Operation by clicking the OPERATIONS tab in the CELLS Route Builder.
Note that there are many Operations located in this OPERATIONS tab and this is
because all the Operations previously created that are in the database CELLS
Workflow MES is currently connected to are also being listed. This is beneficial
because you can utilize on your new Process an Operation that was used on a
previous product routing.
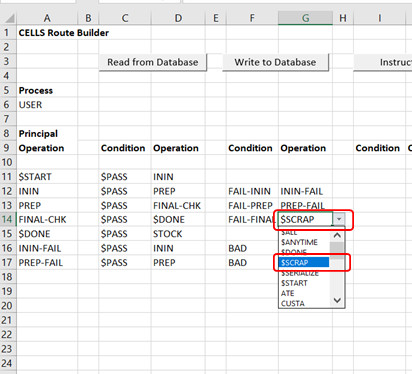
Click on the FLOW tab at the bottom. Click cell
C14 then from the pulldown list click Condition $PASS.
Note that when a Condition starts with $ such as $PASS it is a reserved
Condition defined internally by the CELLS Workflow MES software and is handled
in a strict specific manner.
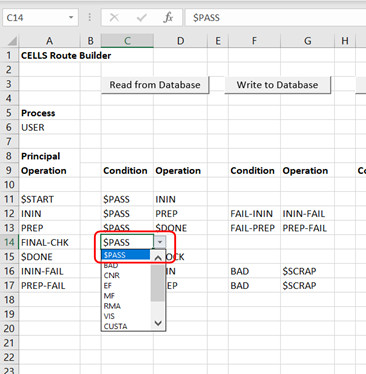
Click cell D14 then from the pulldown list click Operation $DONE. Note that this is the same as with Conditions in that when an Operation starts with $ for example $DONE and $SCRAP it is a reserved Operation defined internally by the CELLS Workflow MES software and is handled in a strict specific manner.
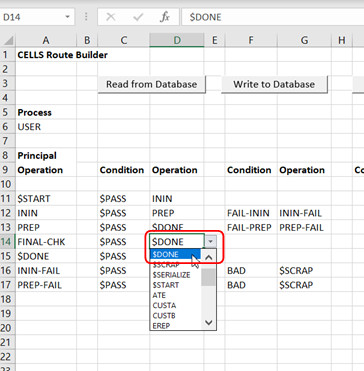
In the above steps we added a Condition of $PASS an
Operation routing to $DONE so that is complete.
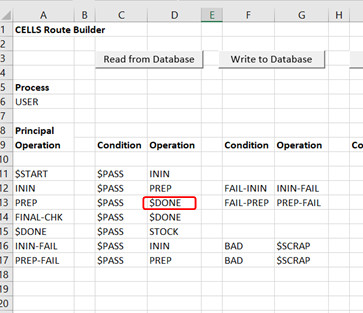
Because we added a new operation FINAL-CHK we want the previous Operation step
PREP on a $PASS condition to go to Operation FINAL-CHK.
In the figure below PREP is currently going on $PASS
to Operation $DONE so we will adjust that in our next step.
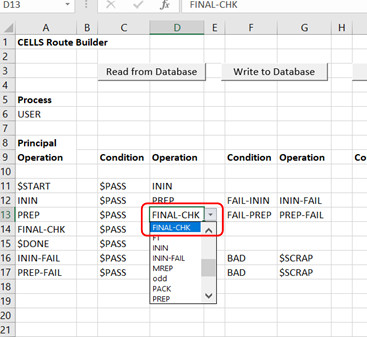
Click cell D13 then from the pulldown list click Operation FINAL-CHK. Now the FLOW is corrected and on $PASS the Operation PREP goes to the next operation step in the routing FINAL-CHK.
In the procedure above we have created one new
Operation and one new step in the routing. You can repeat this process as
much as desired to add additional Operations and steps in your product route.
For help contact Unisoft and we can go online with you.
Creating a new Condition:
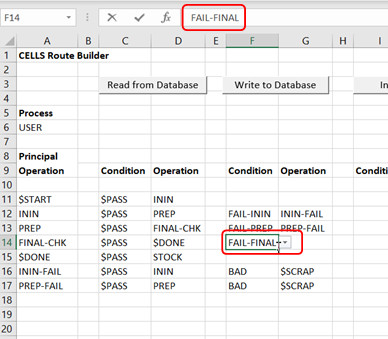
Now we will create a new Condition and see how that's done. Select
the cell F14 and type at the top or directly in the
cell
FAIL-FINAL<enter> for the new Condition and this is the short mnemonic
for the Condition name.
For product
routings you can call the Conditions whatever names you desire for any industry
you are in. For example: AOI-FAIL, ELECT-REPAIR, SMD-TOP-FAIL, COSMETIC-REJECT,
CAN-NOT-REPAIR, CUST-B, CUTTING, QA-FAIL, RMA, SPECIAL-PREP, etc.
Next click YES.
This window is the long name for the Condition. Type
FAILED FINAL INSPECTION and click OK. Note for your product you can use whatever name
you desire.
In the procedure above we have created one new Condition. You can repeat this process as much as desired to add additional Conditions in your product route. For help contact Unisoft and we can go online with you.
The result is this new Condition FAIL-FINAL is created and you can see that Condition by clicking the CONDITIONS tab in the CELLS Route Builder.
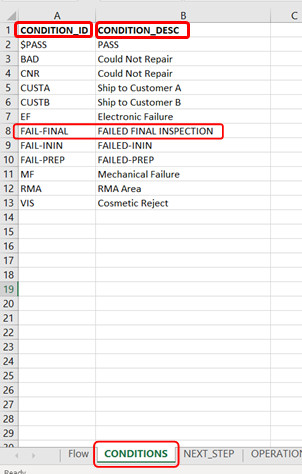
To complete the Condition and Operation set on row 14 we will just sent the unit to an Operation that already exists. Click cell G14 then from the pulldown list click Operation $SCRAP. So if on Operation FINAL-CHK the Condition is FAIL-FINAL the unit will be sent to $SCRAP.
We have finished the process routing above.
By clicking the NEXT STEP tab in the CELLS Route Builder a different view of the Process USER is displayed with the Operation, Condition, etc. in that Process.
To save the process: Click the FLOW tab and then to save the Process USER click WRITE TO DATABASE and
click OK.
The process USER has now been saved to the database that the CELLS Workflow MES
software is connected too.
2) The process routing created is assigned a new Assembly and Work Order using the CELLS Work Order Admin:
What follows is the short version for this step "2) The process routing created is assigned a new Assembly and Work Order using the CELLS Work Order Admin:" and below this short version is the detailed version with a step-by-step breakout and graphics of what is happening.
Short version:
The process routing created above is assigned a new
Assembly and Work Order using the CELLS Work Order Admin:
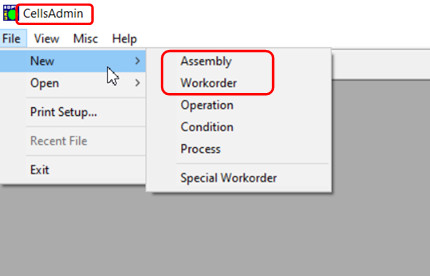
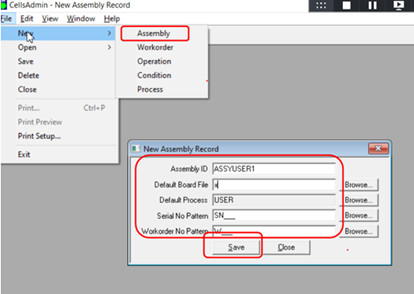
First start the CellsAdmin software.
Creating the ASSEMBLY:
Click FILE / NEW / ASSEMBLY and in the NEW ASSEMBLY RECORD
window type the following in red for each of the fields:
Assembly ID = ASSYUSER1
Default Board File = x
Default Process = USER
Serial No Pattern = SN___ (this is
SN followed by 3 underscores _ )
Workorder No Pattern = W___ (this is
W followed by 3 underscores _ )
Click SAVE when complete. Click CLOSE.
Creating the Work Order:
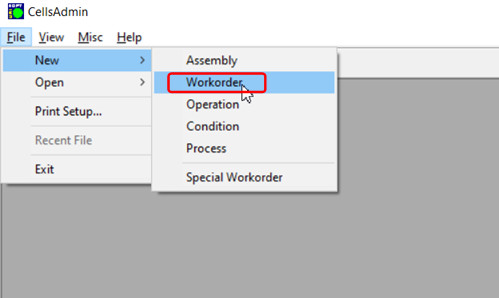
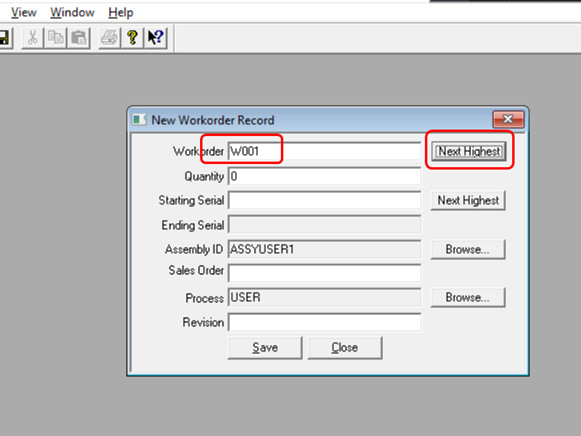
Click NEW and WORKORDER.
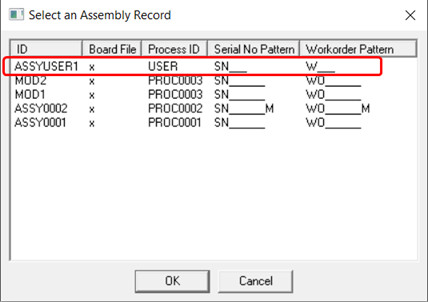
In the ASSEMBLY ID field click BROWSE and select the Assembly
record ASSYUSER1 and click OK.
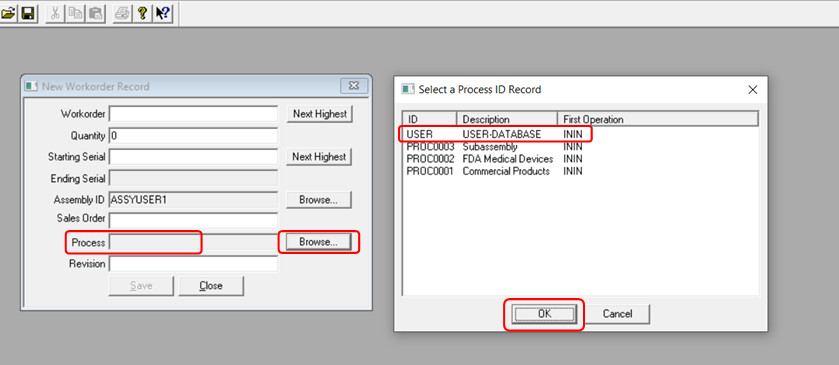
In the PROCESS field click BROWSE and select the Process ID
record USER and click OK.
In the WORKORDER field click NEXT HIGHEST and the result is
workorder number W001.
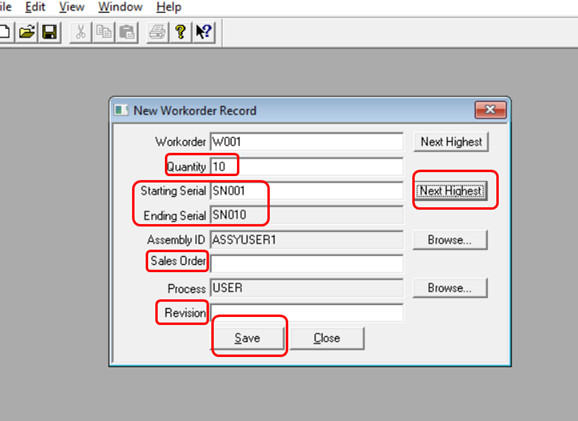
In the QUANTITY field type 10. In the STARTING SERIAL field
click NEXT HIGHEST.
Click SAVE. The Workorder is complete.
-------------
Detailed version:
First start the CellsAdmin software. In the Start/Programs Menu in the "CELLS WORKFLOW MES Product Tracking" folder click CELLS Work Order Admin.
Creating the ASSEMBLY:
If no Assembly exists then one needs
to be created and we will do that in the steps that follow. If an Assembly
exists the OPEN / ASSEMBLY menu would be used.
Click FILE / NEW / ASSEMBLY and in the NEW ASSEMBLY RECORD window type the
following in red for each of the fields:
Assembly ID = ASSYUSER1
Default Board File = x
Default Process = USER
Serial No Pattern = SN___ (this is SN
followed by 3 underscores _ )
Workorder No Pattern = W___ (this is W
followed by 3 underscores _ )
Click SAVE when complete. Click CLOSE.
For your product
routings you can call the Assembly (ASSEMBLY ID) whatever name you desire for
any industry you are in. For example: PCB-ASSY-001, PCB-MOD-01,
BUILD-CONTACT-SUBASSEMBLY, BLADE-01, BREAD, CAKES, CERAMIC, DEPOT-ITEM,
DISNEY-CUSTOM-COVER, ENG-MAINT, FLOW-01, OVERHAUL-ITEM, PASTRY, REPAIR-ITEM,
SEGMENT, SEMICONDUCTOR-WAFER, SWEATSHIRT, VALVE-REPAIR, VEHICLE-1, etc.
For your product
routings you can have whatever SERIAL NO PATTERN and WORKORDER NO PATTERN
numbering you desire for your industry.
If you wish to verify the result click FILE / OPEN / ASSEMBLY and the
ASSYUSER1 record is listed there.
Creating the Work Order:
Using CellsAdmin to create the Workorder in the database. Click NEW and WORKORDER.
Note some customers, typically those that are
larger, will use another system such as an ERP to create their Work Order in
place of Unisoft's CellsAdmin. For example the ERP system will write a workorder
entry directly into the CELLS Workflow MES database.
In the ASSEMBLY ID field click BROWSE and select the Assembly record ASSYUSER1 and click OK.
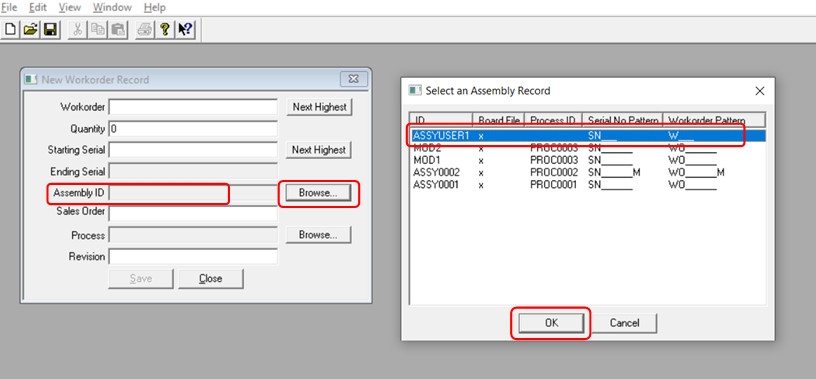
In the PROCESS field click BROWSE and select the Process ID record USER and click OK.
In the WORKORDER field click NEXT HIGHEST and the result is workorder number
W001.
For your product
routings you can call the Workorder whatever name you desire for any industry
you are in. For example: WO0001, PO04284, CUSTOMER-ABC, J124888-1,
320-00115-000, etc.
In the QUANTITY field type 10. In
the STARTING SERIAL field click NEXT HIGHEST. The result should look like the figure below.
Click SAVE. The Workorder is complete.
Note SALES ORDER and REVISION fields can be left blank.
3) Test the new process by running the route through the CELLS Workflow MES software:
What follows is the short version for this step "3) Test the new process by running the route through the CELLS Workflow MES software:" and below this short version is the detailed version with a step-by-step breakout and graphics of what is happening.
Short version:
Test the new process by running the route through the
CELLS Workflow MES software.
First start the CELLS Workflow MES Product Tracking software.
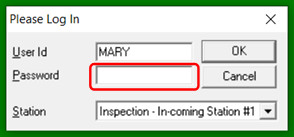
Click OK. MARY will be in the USER ID field and INSPECTION -
IN-COMING STATION #1 in the STATION field.
In the PASSWORD field type 4117 and click OK.
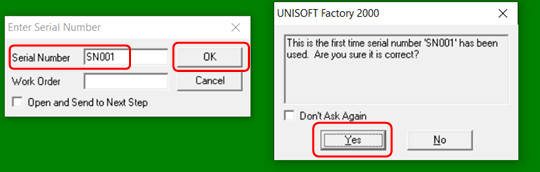
Next click FILE and OPEN SERIAL NUMBER. Type SN001 in hte
SERIAL NUMBER field, click OK. Then click YES again.
Next will move the unit to another step in the process. Click
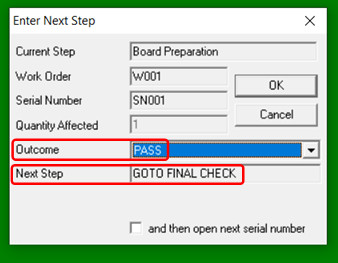
the NEXT-STEP icon in the upper left of the display. In the OUTCOME field PASS
is the default, click OK.
Next we will open the Operation step PREP. Click FILE and
OPEN SERIAL NUMBER. Type SN001 in hte SERIAL NUMBER field, click OK. Then click
YES again.
Next will move the unit to another step in the process and it
will be the new Operation step we created earlier FINAL-CHK .
Click the NEXT-STEP icon in the upper left of the display. In
the OUTCOME field PASS is the default, click OK.
Next will move the unit to another step in the process. Click
the NEXT-STEP icon in the upper left of the display. In the OUTCOME field PASS
is the default, click OK.
So the result is for this test is that serial number SN001
in Workorder W001 has completed its Process USER routing that we created earlier
in the CELLS Route Builder.
-------------
Detailed version:
First start the
CELLS Workflow MES Product Tracking software.
In the Start/Programs Menu in the "CELLS WORKFLOW MES Product Tracking" folder
click
CELLS
Workflow MES Product Tracking.
Click OK. MARY will be in the USER ID field and INSPECTION - IN-COMING STATION #1 in the STATION field. In the PASSWORD field type 4117 and click OK.
Next click FILE and OPEN SERIAL NUMBER. Type SN001 in hte SERIAL NUMBER
field, click OK. Then click YES again.
In this step we opened a new serial number unit from the 10 serialize units SN001-SN010 we define earlier when we created Workorder W001.
The unit in the route is displayed. The top of the display shows the route status of what is being worked on and for Workorder W001 for serial number SN001 the unit is at Operation step ININ.
Note the main display will have a default picture. You can have whatever picture you want at any step in the route displayed by indicating it in the DOCUMENTS table.

Next will move the unit to another step in the process. Click the NEXT-STEP icon in the upper left of the display. In the OUTCOME field PASS is the default, click OK.

In the previous step the Operation completed for serial number SN001 was ININ
and the unit was move to Operation PREP.
Next we will open the Operation step PREP. Click FILE and OPEN SERIAL NUMBER. Type SN001 in hte SERIAL NUMBER
field, click OK. Then click YES again.
The top of the display shows the route status of what is being worked on and for Workorder W001 for serial number SN001 the unit is at Operation step PREP.

Next will move the unit to another step in the process and it will be
the new Operation step we created earlier FINAL-CHK .
Click the
NEXT-STEP icon in the upper left of the display. In the OUTCOME field PASS
is the default, click OK.
Next will move the unit to another step in the process. Click the NEXT-STEP icon in the upper left of the display. In the OUTCOME field PASS is the default, click OK.
So the result is for this test is that serial number SN001
in Workorder W001 has completed its Process USER routing that we created earlier
in the CELLS Route Builder.
The figure below is the Process USER we created earlier on the FLOW tab of the
CELLS Route Builder.
Again all along the procedure outlined above you can enter your own information for your own product tracking as required. For help contact Unisoft and we can go online with you.
4) Database Tables that are edited directly.
MISC:
BRIEF EXAMPLE OF CHANGING AN EXISTING DESCRIPTION OF A PROCESS IN THE NEXT_STEP TABLE
You can use the CELLS Route Builder to change the description in the NEXT_STEP table of a process or you can create a description of a new process. Follow these steps for changing the NEXT_STEP table for a process:
1. Select the Flow sheet.
2. Click the Read from Database button.
3. Click the dropdown arrow in the cell under Process and select a process.
4. Click the Read from
Database button again. You
should see the relevant steps for the process displayed.
5. You can now change the
flow. For the most part, you can
treat the spreadsheet as you would any spreadsheet.
Specifically, you can repeatedly do the following:
a. Change an operation or a condition in a cell. There are three ways:
i. Click the cell, click the dropdown arrow for the cell, and select an operation/condition.
ii. Double-click the cell and type an existing operation/condition.
iii.Double-click the cell and type a new operation/condition. The Builder will prompt you for information that describes the new operation/condition.
b. Delete operations or conditions in one or more cells by selecting a range of cells and clicking the delete key.
c. Delete one or more entire rows.
d. Insert rows.
e. Cut and paste ranges and rows.
6. You have the option of
changing data in the other sheets in the workbook, namely CONDITIONS,
NEXT_STEP, OPERATIONS, and PROCESSES.
Any changes you make to these sheets will be reflected in the Flow
sheet.
7. When you are satisfied
with the state of the description of the steps in the process, click the
Write to Database button to save the data.
Changes to data in
any of the sheets will be written to the database.
BRIEF EXAMPLE OF ADDING A NEW DESCRIPTION OF A PROCESS IN THE NEXT_STEP TABLE
Follow these steps for adding a new process description to the NEXT_STEP table:
1. Select the Flow sheet.
2. Click the Read from Database button.
3. Double-click the cell under Process and enter the name of a new process. The Builder will prompt you for information about the process.
4. The Builder does not change any data on the spreadsheet after you enter a process name. In this way, you can use data from a previously displayed
process, for example, as a starting point in describing the new process.
5. You can now create the
flow. For the most part, you can
treat the spreadsheet as you would any spreadsheet.
Specifically, you can repeatedly do
the following:
a. Add or change an operation or a condition in a cell. There are three ways:
i. Click the cell, click the dropdown arrow for the cell, and select an operation/condition.
ii. Double-click the cell and type an existing operation/condition.
iii.Double-click the cell and type a new operation/condition. The Builder will prompt you for information that describes the new operation/condition.
b. Delete operations or conditions in one or more cells by selecting a range of cells and clicking the delete key.
c. Delete one or more entire rows.
d. Insert rows.
e. Cut and paste ranges and rows.
6. You have the option of
changing data in the other sheets in the workbook, namely CONDITIONS,
NEXT_STEP, OPERATIONS, and PROCESSES.
Any changes you make to these sheets will be reflected in the Flow
sheet.
7. You have the option of
changing data in the other sheets in the workbook, namely CONDITIONS,
NEXT_STEP, OPERATIONS, and PROCESSES.
Any changes you make to these sheets will be reflected in the Flow
sheet.
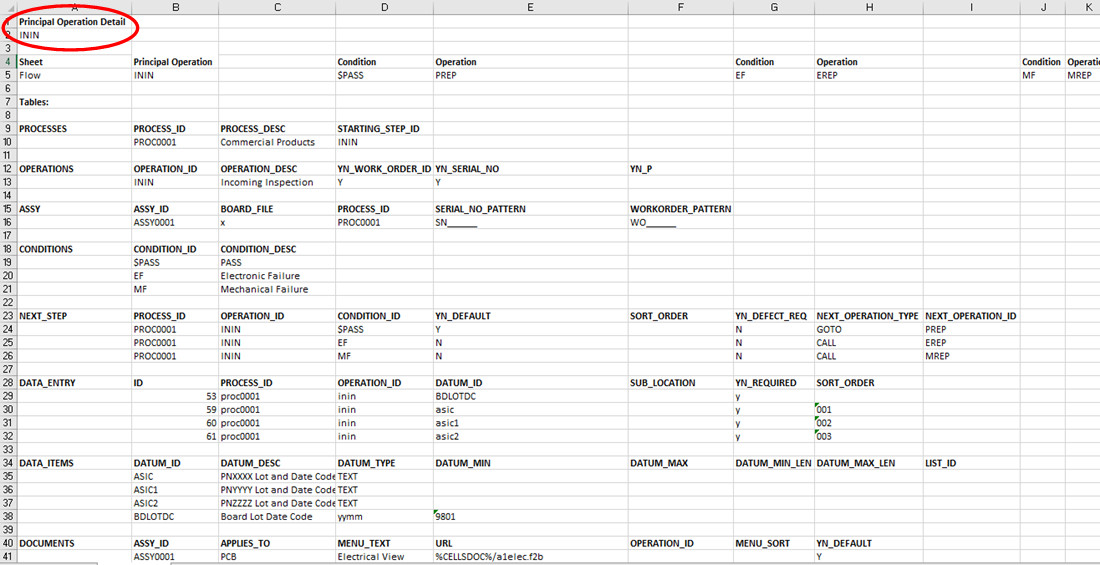
To show the detail on the Operation, right-click anywhere in a row in the spreadsheet. On the dropdown menu that displays, click on the last
item, which should be "Show Principal Operation Detail."
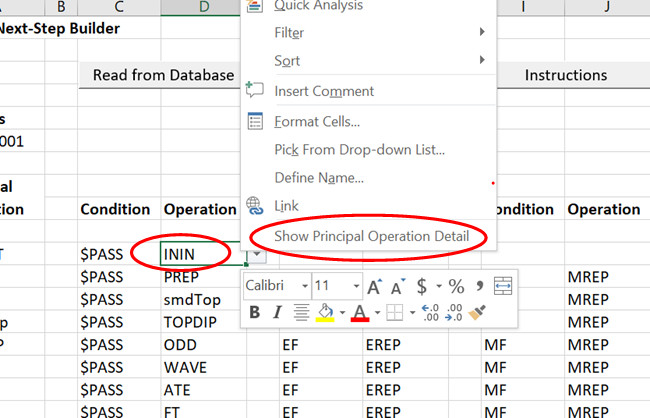
A new Excel spreadsheet will open with more detail on the
Operation.